
Have you made the update to Google Analytics 4 (GA4) yet?
If not, it’s time to move it out of the “there’s still time” basket – seriously – especially for ecommerce websites and businesses.
This is one of the low effort, big impact tasks that your future self will thank you for!
Here’s a breakdown of why it matters – and a step-by-step guide to help you migrate to GA4 easily and tick it off your list before the longstanding version of Analytics goes away.
When do I need to update to GA4?
On 1st July 2023, GA4 will be replacing Google Analytics accounts (a.k.a., Universal Analytics, or the version we’ve all used for years).
There’s no time to lose in making the switch to GA4. Google has made it pretty simple with its guided walk-throughs on how to complete the switch, which you’ll see prominently when you login.
For online businesses, knowing your data is one of your greatest assets allowing you the insights to increase your sales and revenue. And that means being able to compare your data year over year — especially to account for seasonal variations.
It’s critical to get the new GA4 set up for your business now, so that you’re able to analyse your results without large data gaps.
If you’re already very familiar with Universal Analytics, you may initially find GA4 a bit confusing, but understanding the simple difference between the two and changing the way you look at your data will help you take this vital next step now.
What’s the difference between Google Universal Analytics and Google Analytics 4?
The biggest difference between the old and new versions of Google Analytics is the measurement they use. Instead of measuring sessions and page views, GA4 now uses events and parameters.
What this means for you: every tracked event can provide much more detailed information.
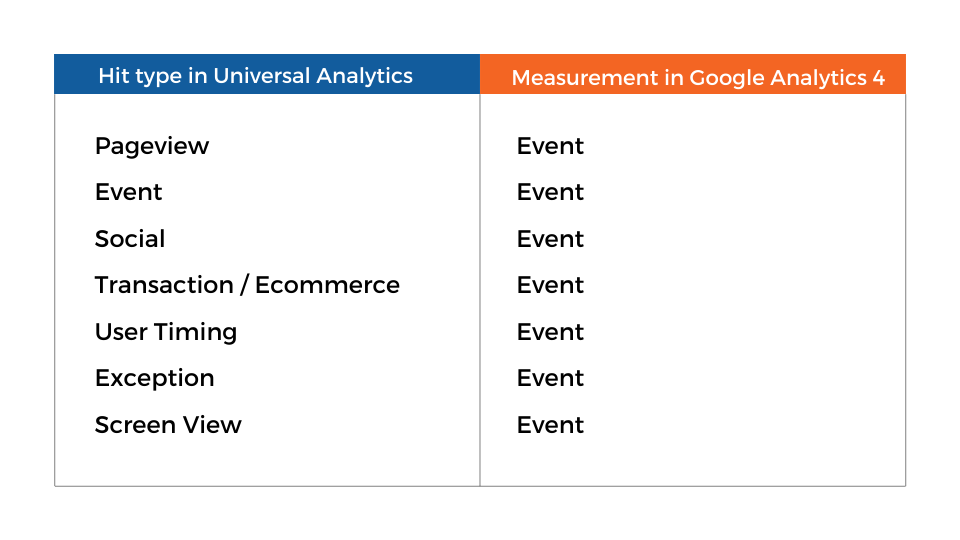
All of your user data can now be tracked in one place. No more siloed data between your website and your app, which means you’re now able to track your customer journey clearly across all devices.
Getting important data from your site is also easier, as Google now has automatic tracking of certain event types without additional coding or tagging required.
Is Google Analytics 4 good for ecommerce?
GA4 is an absolute must if you’re selling online. It’s the best way to see key metrics like transactions, revenue and average order value right down to your most valuable customer journeys.
The analytics inside your ecommerce platform are good, but using GA4 is the closest you’ll come to having a crystal ball.
Not only will you be able to see your key metrics and customer journeys much more clearly, but Google’s AI fills in data gaps and provides clever insights about user behaviour, trends, and anomalies.
How to Set Up GA4 (Easy 4-Step Guide)
Ready to set up GA4 for your site? Let’s do it.
First, log into your current Universal Analytics account and you’ll see a prompt to get started setting up GA4.

From here you’ll see the prompt to get started with the Setup Assistant.
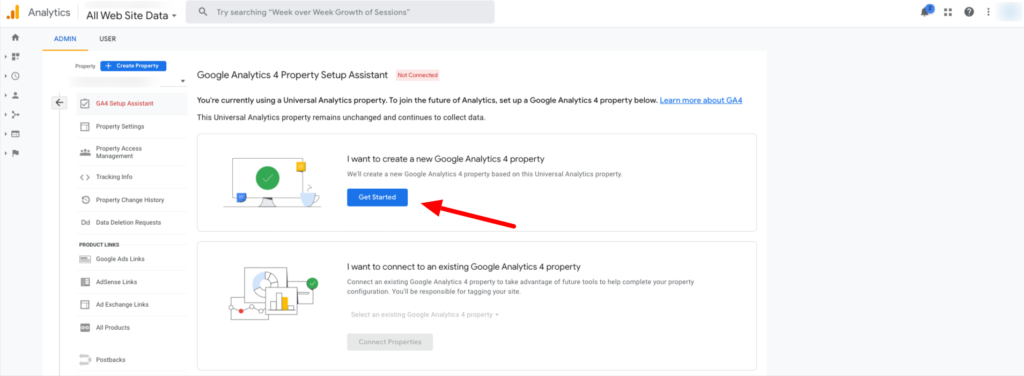
Step 1.
You’ll be prompted to create a new GA4 property. If you don’t already have a global site tag installed, you’ll need to install this in order to start collecting the right data.
If you already have this installed, (and you should if you’ve been using Google Analytics for a while), simply check this box to pass the information through to your new GA4 property.
Create your new property using the button, as shown below.
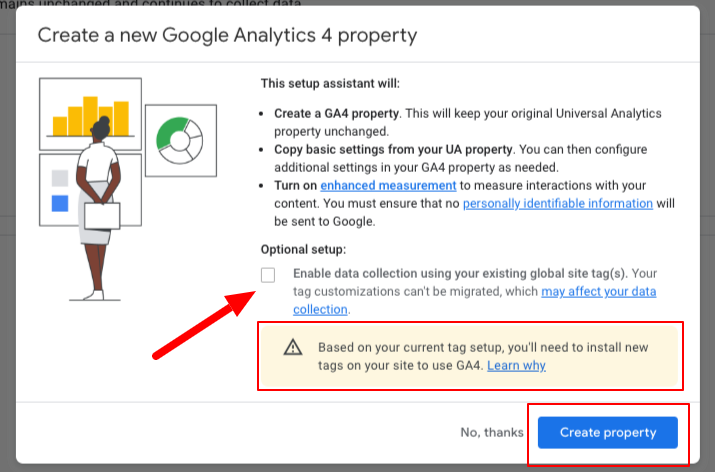
Your property will be automatically created and your new property name and property ID will be shown as illustrated.
Step 2.
Next, go to your GA4 property as highlighted below.

Your Setup Assistant will show you all of the recommended steps to start the data collection and the best property settings to begin with.
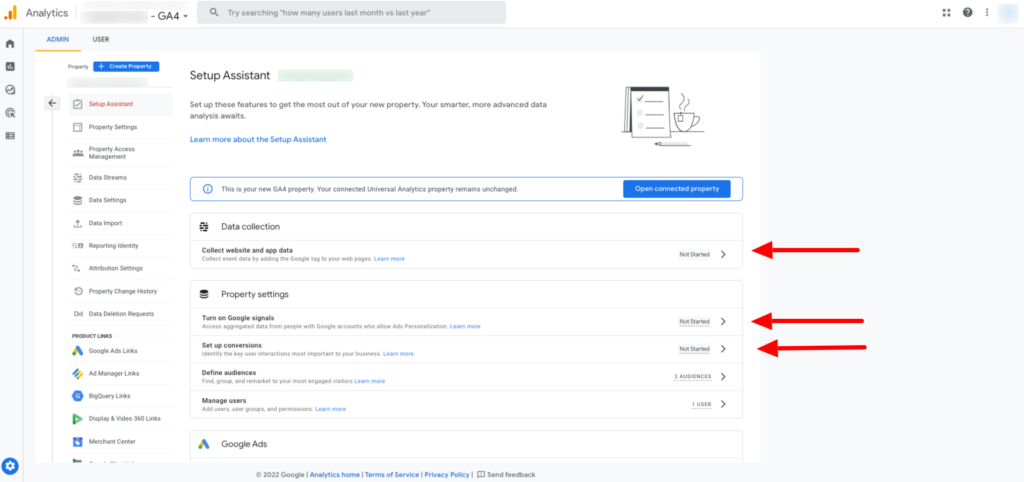
In order to start collecting data from your site, you’ll need to set up your first Data Stream. This is how GA4 will gain basic access to the information it needs.
Step 3.
Setting up your Data Stream is a straightforward process.
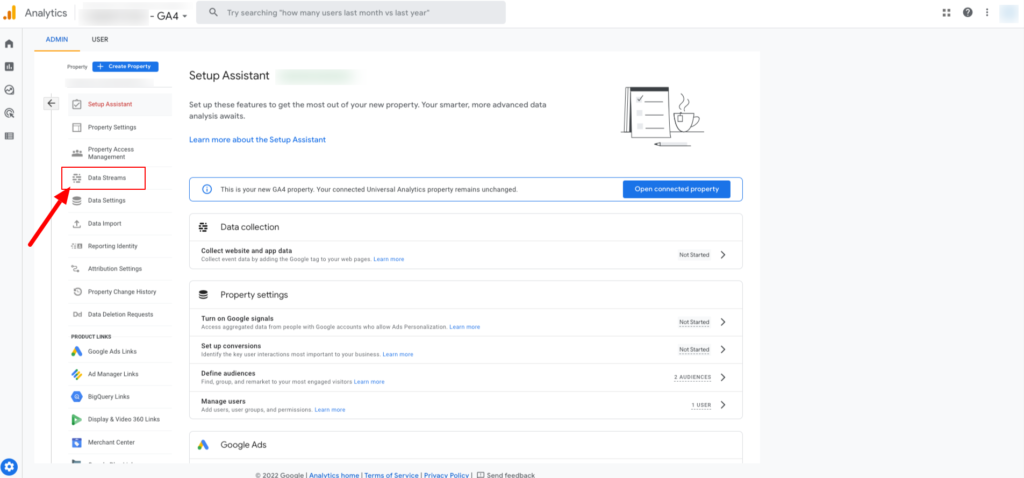
Click through the left hand menu option to access the Data Stream set up.
Once you’re there, you’ll see the options to collect data from “all streams” in one, rather than the old siloed model of adding them each separately. Use the right hand arrow to access the next steps.

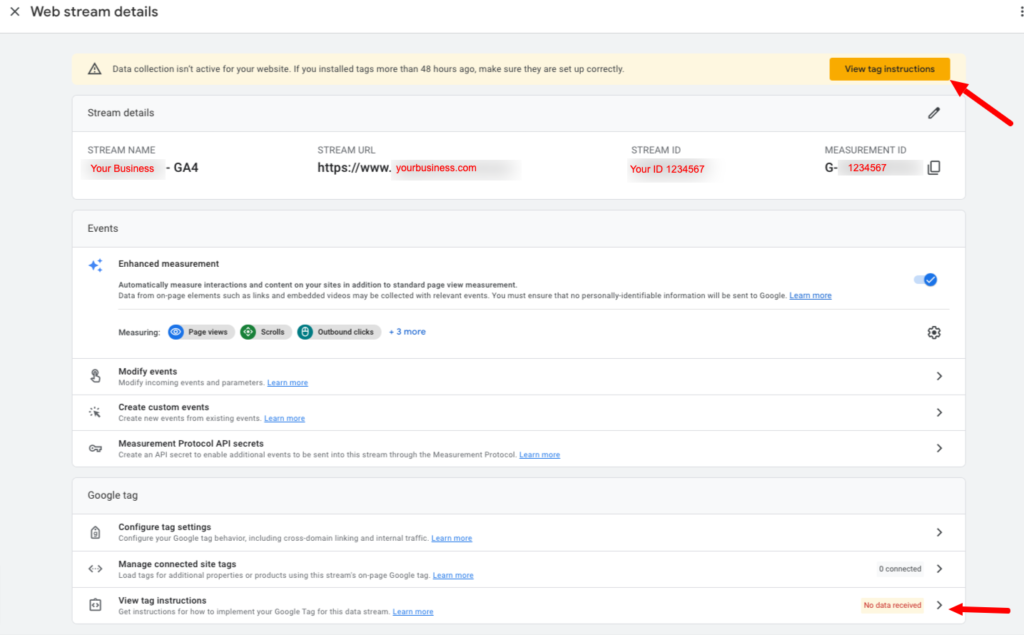
The next window will show your webstream details.
This is where you’ll access the tag instructions to add the tracking code to your website. You can use either of the options highlighted below to show the tagging code.
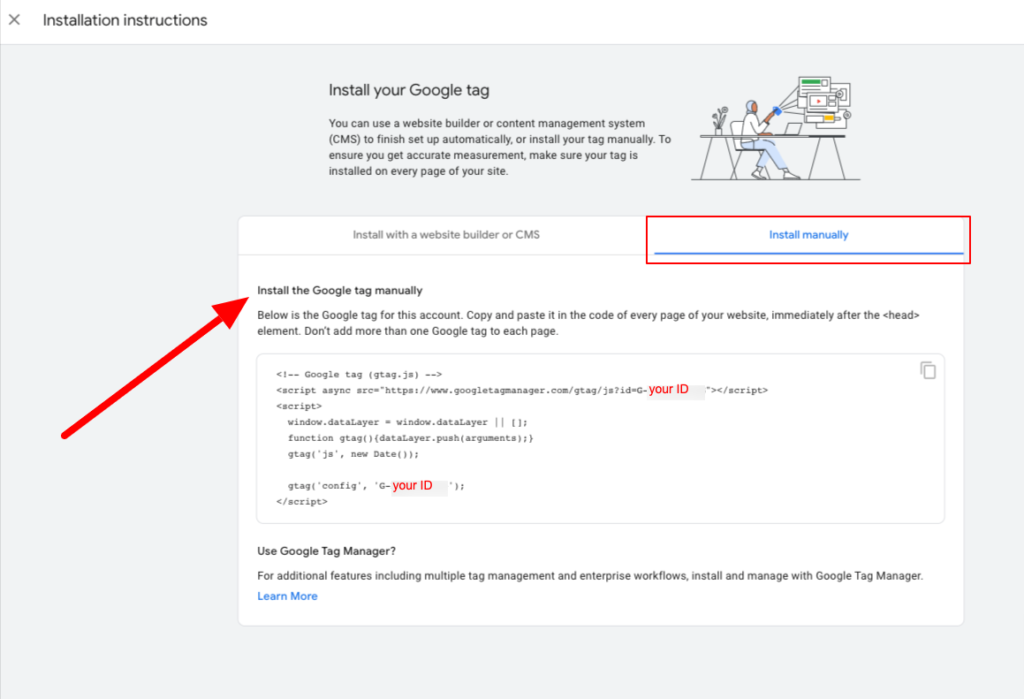
The installation instructions will provide you with the code snippet to add to your website’s <head> code.
Step 4.
Depending on the ecommerce platform you use, there may be different variations to how you can add this tracking code in addition to your Universal Analytics code — and yes, you want to have them both running at the same time.
Shopify users: To install the GA4 code on Shopify, simply add the GA4 tracking code into theme.liquid right after the <head> tag. (Note: You will need a Shopify Pro level account to access this.)
You can also install the Google Analytics 4 code on WooCommerce, BigCommerce and other ecommerce platforms.
Once you’ve copied and pasted this into the correct area of your store backend, allow up to 48 hours for the data to start flowing through.
In some cases, you may be able to see it even more quickly.
You’ve now activated GA4 tracking for your site!
How do I track sales in GA4?
There are a multitude of benefits of tracking your sales in Google Analytics 4:
- Track the performance of your products.
- Track your sales and revenue.
- Optimise your conversion funnel to boost sales.
- Get important Key Performance Indicators (KPIs) that are vital to your business like average order value, ecommerce conversion rate, cart-to-view rate, and more.
- Make data-driven decisions to generate more sales and revenue from your ecommerce store.
Google Analytics 4 doesn’t include the previously named “enhanced ecommerce” as it includes all reports and metrics by default, making it much simpler for you.
You’ll also see the newly named “Purchases” in GA4, which are just the number of completed purchases. This has replaced “Transactions” from Universal Analytics.
The good news is that “Purchase” events are included in some of the newly automatically tracked events in GA4. This means that once your data stream is connected, you’ll start seeing your Purchase event data straight away!
What else does GA4 track automatically?
Remember when you used to have to get your developer to track all kinds of simple actions on your site like scrolls and site searches?
Not anymore.
GA4 now automatically tracks events including page views, scrolls, outbound clicks, site searches, video engagement and file downloads.
Of course there are a multitude of custom events you can also track using Google Tag Manager to implement these.
So, if you’ve been worried about making the transition to Google Analytics 4, don’t be.
While there are a lot of new features, there’s no need to panic or put off connecting your site. GA4 is designed to make data tracking more streamlined, simple and easy to use.
Next Step: Integrate your online store with Transdirect
Taking steps to streamline your ecommerce business can be made even easier by connecting your store to the Transdirect ecommerce shipping integration.
Simply pre-select your preferred couriers to provide the service that best suits your product. Then once customers are at check out, the seamless integration lets them pick which courier, delivery type and rate that suits their needs.
Updating your data to Google Analytics 4 and connecting Transdirect with your ecommerce platform is one of the smartest moves you can make to grow your sales throughout 2023 and beyond.
